

By now you have had a chance to read up on just how beneficial dry brushing can be for supporting your body’s ability to detox itself naturally. If not, please feel free to brush up on the benefits that come with it. It is not often that you come across something that has tons of health benefits and costs little to nothing to acquire. One of my favorite things to do is provide my clients with as many natural and budget-friendly options as possible to help them take back control of their health and happiness. So, when I find something that helps provide aid in a number of different areas throughout the body you better believe I am going to sing its praises.
Benefits Of Detoxing
What’s in it for you? There are several benefits to detoxing that make it ideal to incorporate into your lifestyle. Detoxing has been shown to help dramatically increase energy levels. Who couldn’t use a little bit of a pick me up from time to time? It aids internal organs and improves digestion. Detoxing reduces inflammation and slows down the aging process. It strengthens your immune system while also providing mental clarity. Detoxing also has amazing benefits for skin and hair such as hair strength, length, and shine, skin clarity, texture, radiance, and color. It helps balance hormones and improves mood. More importantly, detoxing helps with weight management and reducing body odor!
The Power of Gut Health
As a doctor, I cannot tell you how many conversations I have daily about autoimmune disorders. Most of my clients have been struggling with an undiagnosed autoimmune disease for years. Others have been diagnosed and are looking for ways to reduce their symptoms. As such, one of the very first things we do is talk about digestive health. Here’s the thing, most people don’t realize that more than half of your immune system is inside of your digestive tract! That’s right, which means when your digestive system has become compromised, your immune system has too! This means that by supporting your digestive health, you are boosting your immunity all in one. I don’t know about you, but I love when I get a two-for-one deal.
Ready to Start?
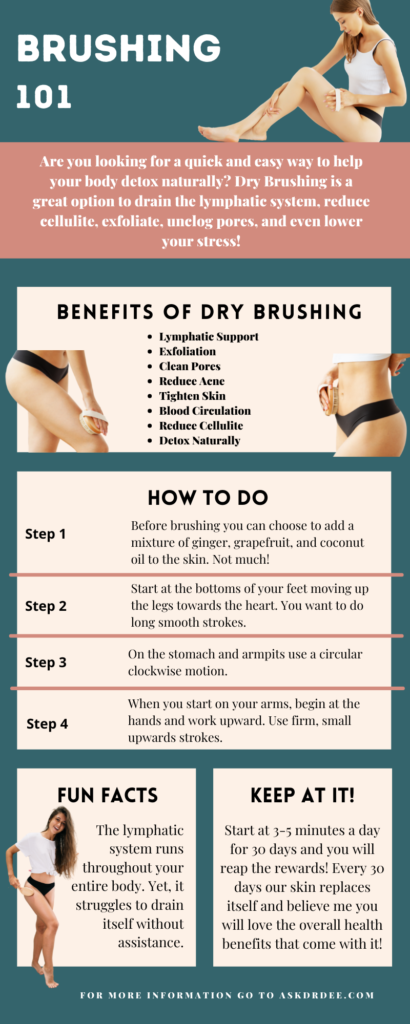
So, you bought your dry skin brush and you have read all the tips and tricks about the technique. You know what the benefits are and how to make them work for you. The trick now is that you need to get started and you have no idea how to do the technique. Everything you have read has probably told you what the techniques are but failed to give you the steps you need. Here are the basic steps for how to dry skin brush and get the most from your brushing routine.
Get in the Shower
One of the first steps you need to take to dry skin brushing is to get in the shower. You want to be in a place where the dry skin is contained and can be removed from the area easily. You will also be showering right after the dry skin brushing in order to remove the extra skin that the brush may not have removed. It will also serve as a method to clean the pores and rejuvenate the cells. If you do not want to shower, you can choose to take a bath instead. As long as one or the other follows the dry skin brushing.
Brush Your Entire Body
One thing that you may be questioning is what part of your body you should dry brush. The truth is you should be brushing your entire body. You may be wondering how to handle areas like breasts and other sensitive areas of the body. All you need to do is brush lighter in these areas, but do not avoid them. You need to remove the dry skin from every area of your body to keep your skin cells moving and to keep the skin healthy. So, the answer is to brush your entire body avoiding anything.

Alternate Your Water Temperature
One aspect of the dry brushing method that you may not consider is the water temperature you use after the procedure. A lot of people suggest going from having the water as hot as you can stand it to as cool as you can stand it. You do not want to do this immediately. Make it a gradual decrease in temperature from hot to cold. This is done to open your pores and then close them, getting them cleaned and then tightened to help with cellulite.
Though you can add several steps into your dry skin brushing, these are the basic steps you get you started. You may find that you want to make this time more of a spa and relaxation time for you by adding essential oils or other techniques. Though those are found to add later, the basics are where you should start.
No Time Like The Present
Keeping your body free of toxins and free radicals is necessary to maintain a healthy life and a healthy mind. Add any of these foods to your regular diet to help your body with its critical detoxifying processes. If you are looking for a safe and all-natural way to detox your body at home be sure to check out my Balancing Abundance Program. Because detoxing is so important and realistically everyone should be doing it on at least a seasonal basis I have taken the time to put together a program to help you do just that. Here’s the thing, I know working with me one-on-one can seem difficult to get into (due to limited space) and I wanted to be able to give everyone an additional solution that has no limits. You deserve to be happy, healthy, and successful at everything you do so here are some recipes to help set you up for success!
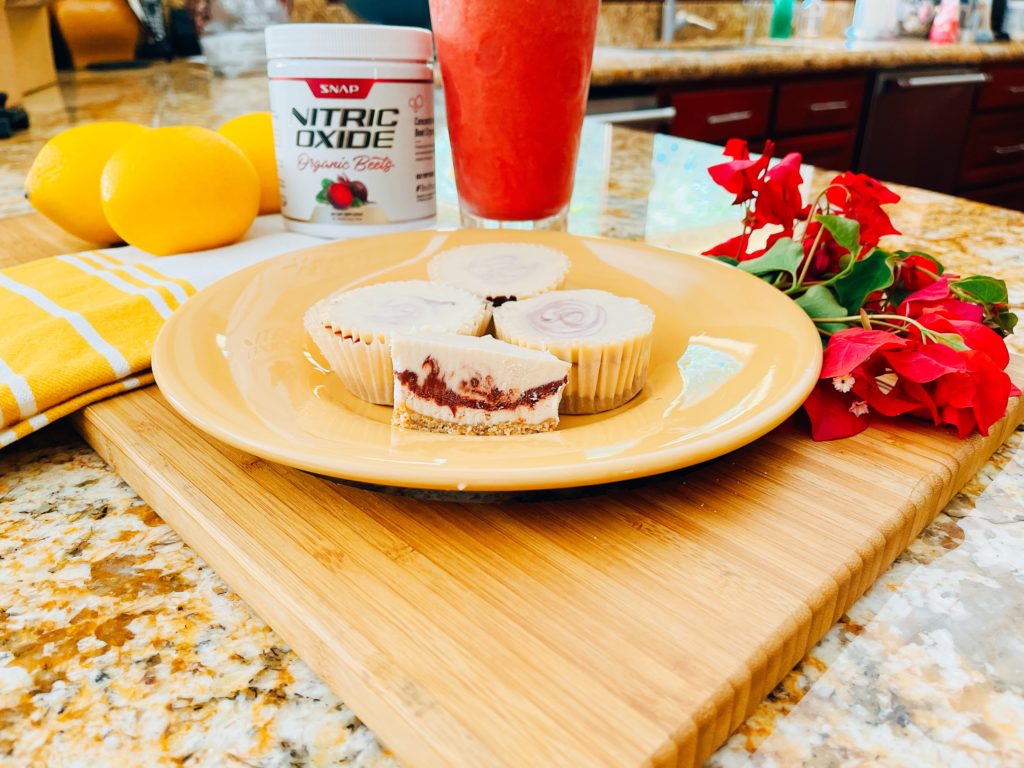
Vegan No-Bake Cheesecake Bites
Gluten-Free Vegan Serves 12
Crust:
- 1 Cup Pitted Dates
- 1 Cup Cashews
Filling:
- 1 1/2 Cups Cashews Soaked (12 hours)
- 1/4 Cup Lemon Juice
- 1/3 Cup Raw Coconut Oil
- 2/3 Cup Full Fat Coconut Milk
- 1/2 Cup Agave Syrup
Chocolate Swirl:
- 3 Tbsp Cacao Powder
- 1/2 Scoop SNAP Beets Powder
- 2 Tbsp Almond Butter
Directions:
Add dates into a food processor and blend until the ball forms. Remove and set aside. Next, add in the dried nuts and blend into a meal-like texture. After which you will return the dates and blend together until a dough forms. Pretreat a cupcake pan with the non-stick option of choice (we used parchment cupcake holders). Scoop 1 Tbsp of crust into cups and press in firmly. Set into the freezer to firm up.
Add all filling ingredients into a blender and mix until very smooth. If it is having trouble coming together feel free to add a little more coconut milk. In a separate bowl combine chocolate swirl ingredients and mix well. Divide evenly amongst the cups with the filling first followed by a tsp of the swirl mixture (for added presentation take a toothpick and swirl the two fillings together). Tap the tray on the countertop a few times to release any air bubbles and freeze for 4-6 hours or until hard.
Once set, remove from the cupcake tin and enjoy. If you are really looking to indulge you can dip these little guys in vegan chocolate using a double boiler to melt the chocolate chips (add 1-2 Tbsp of raw coconut oil to the mix to add some shine) and refreeze for 1-2 hours. Store in the fridge or freezer until ready to enjoy!

Refreshing Watermelon Smoothie
Gluten-Free Vegan Serves 1
- 2 Cups Frozen Watermelon
- 1/2 Scoop SNAP Beets Powder
- 1 Tbsp Hemp Seed
- Juice of 1 Lime
- 4 Basil Leaves Fresh
- 1/2 TBsp Flax Seed
- 12 ounces of Lime Coconut Bia Water
Directions:
Combine all ingredients into a blender and blend until desired texture has been reached.

Tropical Oats with a Mango Chia Jam
Gluten-Free Vegan Serves 1
- 1/2 Cup Gluten-Free Oats
- 1 Tbsp Chia Seeds
- 1/2 Cup Coconut Milk
- 1 Scoop SNAP Greens Powder
- 1/2 TBsp Shredded Coconut Flakes
Mango Chia Jam
- 1/4 Cup Frozen Mango Chunks
- 1/2 Tbsp Lemon Juice
- 1 Tbsp Chia Seeds
Directions:
Into a mason jar combine oats, 1 TBsp chia seeds, and milk. Once base ingredients are mixed well add in and combine the remaining ingredients aside from jam components. Place the jar into the refrigerator overnight. In a microwave-safe container heat the frozen fruit and juice for 1-minute stirring halfway through. Remove from heat and stir in the remaining chia seeds once mixed place into the fridge to set. When ready to eat, take out oats and top with chia jam. I like to add in a little more coconut milk and even coconut whipped cream on top. Enjoy!

Need A Hand?
A happy and healthy life is closer than you may think. We all have to deal with our health daily, and when we don’t feel our best, it shows. If you are tired of just making it through your day, you NEED to start investing in your health today! You are not alone on this journey. If you ever need any help, I am always here to do just that. Even if it is something as small as acting as a sounding board, do you have any questions or concerns I can help you with? Feel free to contact me directly at [email protected], or you can even book a one-on-one call with me. Be sure to subscribe to gain access to tons of free goodies and check back daily for more great recipes and information!